Today is my 27th birthday!!
My parents are taking Mister and I out for dinner at my favorite restaurant. Which we never go to cause we can't (actually, don't want to) afford it. Yay!
Thursday, January 14, 2010
Updating Our Thermostat
Our house was built in 1951 and never updated. We still have a propane fueled boiler heat system and radiators. Radiators are supposed to put off the best heat available. Unfortunately, ours is extremely outdated. We have a HVAC guy coming to check everything out on Monday, the 18th, but in the initial telephone consultation he told Mister that our boiler is probably running at 53% efficiency. What a waste of energy. Bah. We just had $700 worth of propane delivered to use on about the 20th of December and we will need more in about a week. Can you imagine? We had no idea. The heating bill is killing us. We have been keeping our house at 60 degrees. So. Freaking. Cold. Brrr.
Until we can afford to totally replace the system (hopefully in the next few months), we are attempting to update/retain heat where we can:
Mister put weather stripping around the basement door and the master bath window to stop the breeze that was coming through.
I finially finished the cafe curtains in the kitchen, which should help a teeny bit there.
We put plastic over the inside of the kitchen fan, because you could actually feel wind in the kitchen.
I threw some IKEA curtain panels up in the top story on the existing yucky curtain rods.
And we put another curtain panel over the doorway leading upstairs.
My lovely Crate and Barrel double curtain rod came in on Wednesday, so I hope to get that and some curtains up soon in the living room.
And finally, I bought us a new thermostat. A Honeywell RTH6400, to be exact. The model recommended by Young House Love. I know nothing about thermostat's so I figured it was as good as any, right? It allows you to program your 5-day workweek differently from your weekends.
Here is how our original thermostat looked.
3. Label wire with supplied tags.
(Here's where I ran into problems. I totally wanted to do this BY MYSELF, since besides painting and slow-going sewing, I am kinda useless. The directions say to label the wires with the included labels as you detach them from your previous thermostat. Okay. But the instructions show 4 wires and we only have 2 wires. Plus, they show the wires labeled on the old thermostat. Ours aren't. I have no idea what Y, G, R, and W stand for. So I had to consult Mister, since he's an electrician and all. Apparently, Y is yellow, G is green, R is red, and W is white. I felt a little silly, but how in the heck was I supposed to know that? So after he told me that I was back on track. )
4. Mount new wallplate.
6. Pop on thermostat.
Until we can afford to totally replace the system (hopefully in the next few months), we are attempting to update/retain heat where we can:
Mister put weather stripping around the basement door and the master bath window to stop the breeze that was coming through.
I finially finished the cafe curtains in the kitchen, which should help a teeny bit there.
We put plastic over the inside of the kitchen fan, because you could actually feel wind in the kitchen.
I threw some IKEA curtain panels up in the top story on the existing yucky curtain rods.
And we put another curtain panel over the doorway leading upstairs.
My lovely Crate and Barrel double curtain rod came in on Wednesday, so I hope to get that and some curtains up soon in the living room.
And finally, I bought us a new thermostat. A Honeywell RTH6400, to be exact. The model recommended by Young House Love. I know nothing about thermostat's so I figured it was as good as any, right? It allows you to program your 5-day workweek differently from your weekends.
Here is how our original thermostat looked.
Classy, right?
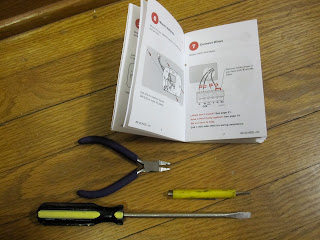
Here's what you'll need for the switch.
Large flathead screwdriver, teeny flathead screw driver, the instruction manual(obviously), and some needle nose pliers. I couldn't find my needlenose, so I used my "turn your crimp bead into a ball" pliers. Worked fine.
The directions for installation seem really simple:
1. Turn off power to heating/cooling system.
2. Remove Old Thermostat.
If your existing thermostat has mercury, call your local waste people and find out how to dispose of it. Do Not Throw It Away!
3. Label wire with supplied tags.
(Here's where I ran into problems. I totally wanted to do this BY MYSELF, since besides painting and slow-going sewing, I am kinda useless. The directions say to label the wires with the included labels as you detach them from your previous thermostat. Okay. But the instructions show 4 wires and we only have 2 wires. Plus, they show the wires labeled on the old thermostat. Ours aren't. I have no idea what Y, G, R, and W stand for. So I had to consult Mister, since he's an electrician and all. Apparently, Y is yellow, G is green, R is red, and W is white. I felt a little silly, but how in the heck was I supposed to know that? So after he told me that I was back on track. )
4. Mount new wallplate.
5. Connect wires.
6. Pop on thermostat.
Done and done.
Of course, you have to program it, which I did first, so it would be ready to go when I plugged it in.
And I didn't even chip my new hideous nail polish!
Mature, isn't it?
BTW: That dent is not normally on my finger, it's from the installation process. Somehow.
Subscribe to:
Comments (Atom)


